教程重点介绍人物头发的处理,因为素材图片人物五官已经非常精致,大致调色和磨皮后就已经很好看了,不需要过多的修饰。
原图

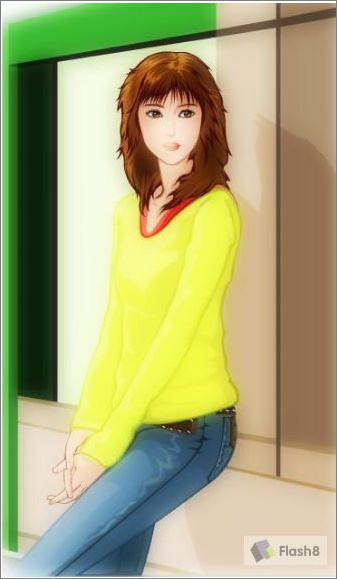
最终效果

1、修改图片分辨率,200~300都行,像素大小10M左右就够了,大了容易卡。

2、然后就是调色啦,色阶感觉还可以。

3、把背景层复制两层,图层1副本模式为柔光,把图层1中间值,数值5。

4、在图层1副本上面执行滤镜——其它——高反差保留,数值85,然后ctrl+e向下合并图层。

5、然后再把图层1复制一层,执行滤镜——杂色——中间值,数值为7。

6、在图层1副本上建立白色蒙版,用黑色画笔把五官擦出来,画笔的不透明度可以小一点,然后向下合并,这张图的皮肤就完成了(这就是高清图的好处呀)。

7、这么精致的五官看着都不好意思毁了,就先说头发吧,用快速选择工具把头发大致选出来,羽化12个像素后ctrl+j复制一层。

8、用涂抹工具顺着头发的走向涂抹,随时调节涂抹工具的大小了力度,左边是涂抹过的。

9、全部涂抹完之后调一下色,这个随自己喜欢吧,看你想把整张图转成什么色调的。

10、当然如果觉得边上的碎头发不好处理的话可以用画笔吸取背景色把它们盖了,这样就不会觉得乱糟糟的了。

11、用加深减淡工具处理一下,减淡亮的,加深暗的。

12、用钢笔工具勾出路径,走向要按头发来,吸取头发上深一点的颜色,不是黑色哈,用画笔描边,再用方框模糊,数值12。

13、新建图层,同样的操作再来一次,这次的颜色换成在亮部吸取。

14、继续新建图层,还是勾路径的过程,颜色比上一次再浅一点,现在可以把画笔调到10左右了,描边之后方框模糊,再下一步还是跟这一步一样,下下步也是,每次的颜色不要差太多,最好只在明暗上面变化,不然就成炫彩风了,还有每次的路径不要一样,要稍微有点变化。

15、描边差不子我就用画笔加些点上去,再高斯模糊,我这个图是关了预览的,数值就是40左右。

16、新建图层,填充黑色,模式改为颜色减淡,用白色低不透明度画笔在头发上点,高光就出来了,也可以用钢笔在上面勾路径,照样白色画笔描边,这样就可以画出很亮的发丝了。

17、最后加点细碎的发丝,画笔大小5左右就行颜色深一点的。

最终效果:
原图
最终效果
1、修改图片分辨率,200~300都行,像素大小10M左右就够了,大了容易卡。
2、然后就是调色啦,色阶感觉还可以。
3、把背景层复制两层,图层1副本模式为柔光,把图层1中间值,数值5。
4、在图层1副本上面执行滤镜——其它——高反差保留,数值85,然后ctrl+e向下合并图层。
5、然后再把图层1复制一层,执行滤镜——杂色——中间值,数值为7。
6、在图层1副本上建立白色蒙版,用黑色画笔把五官擦出来,画笔的不透明度可以小一点,然后向下合并,这张图的皮肤就完成了(这就是高清图的好处呀)。
7、这么精致的五官看着都不好意思毁了,就先说头发吧,用快速选择工具把头发大致选出来,羽化12个像素后ctrl+j复制一层。
8、用涂抹工具顺着头发的走向涂抹,随时调节涂抹工具的大小了力度,左边是涂抹过的。
9、全部涂抹完之后调一下色,这个随自己喜欢吧,看你想把整张图转成什么色调的。
10、当然如果觉得边上的碎头发不好处理的话可以用画笔吸取背景色把它们盖了,这样就不会觉得乱糟糟的了。
11、用加深减淡工具处理一下,减淡亮的,加深暗的。
12、用钢笔工具勾出路径,走向要按头发来,吸取头发上深一点的颜色,不是黑色哈,用画笔描边,再用方框模糊,数值12。
13、新建图层,同样的操作再来一次,这次的颜色换成在亮部吸取。
14、继续新建图层,还是勾路径的过程,颜色比上一次再浅一点,现在可以把画笔调到10左右了,描边之后方框模糊,再下一步还是跟这一步一样,下下步也是,每次的颜色不要差太多,最好只在明暗上面变化,不然就成炫彩风了,还有每次的路径不要一样,要稍微有点变化。
15、描边差不子我就用画笔加些点上去,再高斯模糊,我这个图是关了预览的,数值就是40左右。
16、新建图层,填充黑色,模式改为颜色减淡,用白色低不透明度画笔在头发上点,高光就出来了,也可以用钢笔在上面勾路径,照样白色画笔描边,这样就可以画出很亮的发丝了。
17、最后加点细碎的发丝,画笔大小5左右就行颜色深一点的。
最终效果:
版权声明
本文仅代表作者观点,不代表本站立场。
本文系作者授权发表,未经许可,不得转载。
本文地址:/PMsheji/zhaopianchuli/152919.html