来源:潘少俊衡 作者:不详
本教程的字体效果制作过程比较简单。运用一些简单的图层样式即可完成。不过作者非常尽职,非常详细的介绍了超酷的背景的制作,配合起来效果就更加完美。
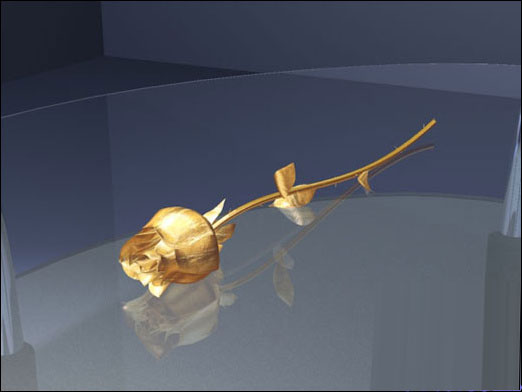
最终效果

1、创建1000X800的文档,添加一个图层,填充为黑色,然后设置前景色和背景色为#2D2337和#181818,然后执行云彩滤镜(滤镜 > 渲染 > 云彩),然后再执行动感模糊。

2、创建一个组,命名为text,然后设置文字面板,输入文字。

3、双击添加图层样式。

斜面浮雕图层样式。

内阴影样式。

描边样式。

外发光样式。

4、创建新图层组light,复制Layer1然后移到light里面。

5、添加光晕滤镜。

6、添加一个阴影图层,绘制阴影笔刷大小200-300px,颜色为黑色。

7、然后设置渐变。

8、绘制新图层,然后添加一个矩形选区填充颜色为白色。笔刷大小为200-300px。

9、旋转。

10、设置模式为叠加,然后重复几次。

11、设置不透明度(分别为22% , 56% and 65%)。

12、这时图层面板如下。


13、用软的橡皮擦工具去掉不需要的部分。

14、添加阴影图层样式。

15、绘制一个从黑色到透明的渐变。

16、添加杂色。

17、设置模式为滤色。天正色阶。

18、按Q进入快速蒙板。

19、反选,然后按DELETE。

20、建立一些星星,高斯模糊。

21、创建一个新图层制作黑色到透明的渐变,设置图层模式为叠加。

22、绘制一些小的圆。

23、设置样式。

24、复制图层组。

25、拼合light copy图层,然后创建一个蒙板,绘制一个形状。

26、添加图层样式。

27、按Ctrl+G群组。

28、复制light copy图层,设置图层模式为颜色减淡,不透明度为26%。

29、复制RoyalTutorial图层,然后添加阴影效果。

30、添加图层样式。

外发光效果。

最终效果。
本教程的字体效果制作过程比较简单。运用一些简单的图层样式即可完成。不过作者非常尽职,非常详细的介绍了超酷的背景的制作,配合起来效果就更加完美。
最终效果
1、创建1000X800的文档,添加一个图层,填充为黑色,然后设置前景色和背景色为#2D2337和#181818,然后执行云彩滤镜(滤镜 > 渲染 > 云彩),然后再执行动感模糊。
2、创建一个组,命名为text,然后设置文字面板,输入文字。
3、双击添加图层样式。
斜面浮雕图层样式。
内阴影样式。
描边样式。
外发光样式。
4、创建新图层组light,复制Layer1然后移到light里面。
5、添加光晕滤镜。
6、添加一个阴影图层,绘制阴影笔刷大小200-300px,颜色为黑色。
7、然后设置渐变。
8、绘制新图层,然后添加一个矩形选区填充颜色为白色。笔刷大小为200-300px。
9、旋转。
10、设置模式为叠加,然后重复几次。
11、设置不透明度(分别为22% , 56% and 65%)。
12、这时图层面板如下。
13、用软的橡皮擦工具去掉不需要的部分。
14、添加阴影图层样式。
15、绘制一个从黑色到透明的渐变。
16、添加杂色。
17、设置模式为滤色。天正色阶。
18、按Q进入快速蒙板。
19、反选,然后按DELETE。
20、建立一些星星,高斯模糊。
21、创建一个新图层制作黑色到透明的渐变,设置图层模式为叠加。
22、绘制一些小的圆。
23、设置样式。
24、复制图层组。
25、拼合light copy图层,然后创建一个蒙板,绘制一个形状。
26、添加图层样式。
27、按Ctrl+G群组。
28、复制light copy图层,设置图层模式为颜色减淡,不透明度为26%。
29、复制RoyalTutorial图层,然后添加阴影效果。
30、添加图层样式。
外发光效果。
最终效果。
版权声明
本文仅代表作者观点,不代表本站立场。
本文系作者授权发表,未经许可,不得转载。
本文地址:/PMsheji/wenzitexiao/158808.html