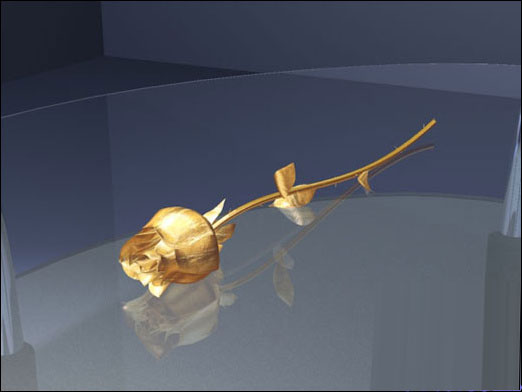
最终效果图

制作过程:
1、新建一个文件。打开通道面板,复制红通道为红副本通道。
2、按D键将颜色设置为默认颜色,执行菜单栏中的“滤镜”“渲染”“云彩”命令,将红副本通道生成云彩效果,如图01所示。

3、执行菜单栏中的“滤镜”“风格化”“浮雕效果”命令,在弹出的对话框中设置各项参数,如图02所示,图像效果如图03所示。


4、执行菜单栏中的“图像”“调整”“色阶”命令,在弹出的对话框中设置参数如图04所示,图像效果如图05所示。


5、设置前景色的RGB分别为186、185、185,在图层面板中新建图层1,按Alt+Delete键为图层1填充灰色,如图06所示。

6、返回通道面板,按住Ctrl键单击红副本通道,将图像载入选区,效果如图07所示。

7、返回图层面板,选择图层1,设置前景色为黑色,按Alt+Delete键填充选区,图像效果如图08所示。

8、执行菜单栏中的“滤镜”“渲染”“光照效果”命令,在弹出的对话框中设置各项参数如图09所示,图像效果如图10所示。


9、选择工具箱中的文字工具,在字符面板中设置参数,在窗口中输入文字,效果如图11所示。

10、在文字图层上单击右键,在弹出的快捷菜单中选择栅格化图层,将文字层转换为普通层。
11、打开两张纹理素材图片,效果如图12、13所示。


12、执行菜单栏中的“编辑”“定义图案”命令,在弹出的对话框中保持默认设置,将两个图像定义为图案。
13、双击文字图层,在弹出的对话框中选择“投影”“内阴影”“外发光”样式,设置各项参数如图14-16所示。


14、接着在图层样式对话框中选择“内发光”“斜面和浮雕”“等高线”“纹理”“光泽”“颜色叠加”“图案叠加”样式,设置参数如图17-24所示。


图18


制作过程:
1、新建一个文件。打开通道面板,复制红通道为红副本通道。
2、按D键将颜色设置为默认颜色,执行菜单栏中的“滤镜”“渲染”“云彩”命令,将红副本通道生成云彩效果,如图01所示。
3、执行菜单栏中的“滤镜”“风格化”“浮雕效果”命令,在弹出的对话框中设置各项参数,如图02所示,图像效果如图03所示。
4、执行菜单栏中的“图像”“调整”“色阶”命令,在弹出的对话框中设置参数如图04所示,图像效果如图05所示。
5、设置前景色的RGB分别为186、185、185,在图层面板中新建图层1,按Alt+Delete键为图层1填充灰色,如图06所示。
6、返回通道面板,按住Ctrl键单击红副本通道,将图像载入选区,效果如图07所示。
7、返回图层面板,选择图层1,设置前景色为黑色,按Alt+Delete键填充选区,图像效果如图08所示。
8、执行菜单栏中的“滤镜”“渲染”“光照效果”命令,在弹出的对话框中设置各项参数如图09所示,图像效果如图10所示。
9、选择工具箱中的文字工具,在字符面板中设置参数,在窗口中输入文字,效果如图11所示。
10、在文字图层上单击右键,在弹出的快捷菜单中选择栅格化图层,将文字层转换为普通层。
11、打开两张纹理素材图片,效果如图12、13所示。
12、执行菜单栏中的“编辑”“定义图案”命令,在弹出的对话框中保持默认设置,将两个图像定义为图案。
13、双击文字图层,在弹出的对话框中选择“投影”“内阴影”“外发光”样式,设置各项参数如图14-16所示。
14、接着在图层样式对话框中选择“内发光”“斜面和浮雕”“等高线”“纹理”“光泽”“颜色叠加”“图案叠加”样式,设置参数如图17-24所示。
图18
版权声明
本文仅代表作者观点,不代表本站立场。
本文系作者授权发表,未经许可,不得转载。
本文地址:/PMsheji/wenzitexiao/157205.html