本例是关于Photoshop处理照片,主要介绍了如何将普通照片作成漫画般唯美绚烂的效果,主要通过使用图层的技法,着重处理头发,以达到炫彩莹亮的发丝。感兴趣的网友可以动手跟着教程来操作。

原图

效果图1

效果图2
一、打开要处理头发的照片,新建一个图层放在上层,用油漆桶填充黑色,并将此图层模式改为“颜色减淡”

图1
一、打开要处理头发的照片,新建一个图层放在上层,用油漆桶填充黑色,并将此图层模式改为“颜色减淡”
图1
二、现在依旧在这个图层上,选用白色柔角画笔(大小由图而定,不透明度45%,流量60%左右)在头发受光处画一条光带,长发的话也可以在发梢处加一点。

图2
三、接下来是细节的刻画,用钢笔顺着头发的走势勾画几根主要的路径,按住ALT键复制拖移。
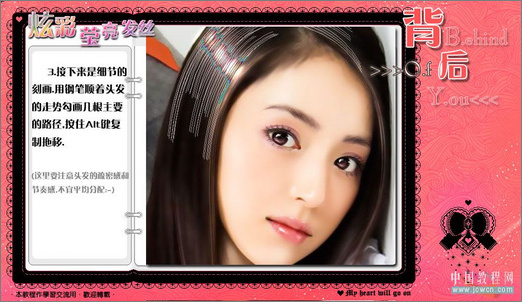
图3
四、描边

图4
五、现在头发的效果已经很明显的出来了,盖印可见图层(Shift+Ctrl+Alt+E),适当使用模糊工具处理一下头发的虚实关系,调整画面,加些背景点缀什么的,便大功告成!

图5
版权声明
本文仅代表作者观点,不代表本站立场。
本文系作者授权发表,未经许可,不得转载。
本文地址:/PMsheji/zhaopianchuli/159541.html