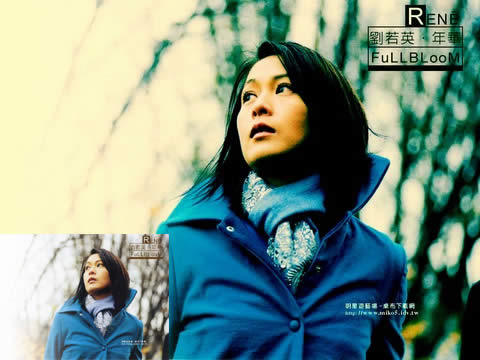
素材图片主色为黄绿色,调色的时候需要把绿色,青色等都转为淡绿色;黄色部分转为粉红色;然后在顶部边角位置增加一些高光即可。
原图

最终效果

1、打开素材图片,创建可选颜色调整图层,对红、黄、绿、白,黑进行调整,参数设置如图1 - 5,效果如图6。这一步主要把图片中的绿色调淡一点。

<图1>

<图2>

<图3>

<图4>

<图5>

<图6>
2、创建色相/饱和度调整图层,对黄、绿、青,蓝进行调整,参数设置如图7 - 10,效果如图11。这一步主要把图片中的黄,青色转为绿色。

<图7>

<图8>

<图9>

<图10>

<图11>
3、创建可选颜色调整图层,对红、黄、绿,青进行调整,参数设置如图12 - 15,效果如图16。这一步微调图片中的暖色,并把绿色部分调淡。

<图12>

<图13>

<图14>

<图15>

<图16>
4、创建色相/饱和度调整图层,对绿色进行调整,参数及效果如下图。这一步再把绿色部分调淡。

<图17>

<图18>
5、按Ctrl + J 把当前色相/饱和度调整图层复制一层,不透明度改为:50%,效果如下图。

<图19>
6、创建可选颜色调整图层,对红、黄、绿,白进行调整,参数设置如图20 - 23,效果如图24。这一步主要给图片高光部分增加淡绿色。

<图20>

<图21>

<图22>

<图23>

<图24>
7、创建纯色调整图层,颜色设置为淡绿色:#EDF6E5,确定后把蒙版填充黑色,用白色画笔把右上角部分擦出来,效果如下图。

<图25>
8、按Ctrl + J 把当前纯色调整图层复制一层,混合模式改为“滤色”,不透明度改为:50%,在按Ctrl + Alt + G 创建剪切蒙版,然后把蒙版填充黑色,用白色画笔把右上角局部擦出来,效果如下图。

<图26>
9、创建色彩平衡调整图层,对高光进行调整,参数设置如图27,确定后同上的方法创建剪切蒙版,效果如图28。这几步给图片增加高光。

<图27>

<图28>
10、创建曲线调整图层,对RGB、红,绿通道进行调整,参数设置如图29,确定后把蒙版填充黑色,用白色画笔把左侧边缘部分涂出来,效果如图30。

<图29>

<图30>
11、创建曲线调整图层,把图片暗部调暗一点,参数及效果如下图。

<图31>

<图32>
12、新建一个图层,按字母键“D”把前,背景颜色恢复到默认的黑白,然后选择菜单:滤镜 > 渲染 > 云彩,确定后把混合模式改为“滤色”,不透明度改为:25%,效果如下图。

<图33>
13、创建色彩平衡调整图层,对阴影,高光进行调整,参数设置如图34,35,确定后按Ctrl + Alt + G 创建剪切蒙版,效果如图36。

<图34>

<图35>

<图36>
14、创建可选颜色调整图层,对红色进行调整,参数设置如图37,确定后把图层不透明度改为:50%,效果如图38。这一步微调人物肤色。

<图37>

<图38>
最后简单美化一下人物,微调一下颜色,完成最终效果。

原图

最终效果

1、打开素材图片,创建可选颜色调整图层,对红、黄、绿、白,黑进行调整,参数设置如图1 - 5,效果如图6。这一步主要把图片中的绿色调淡一点。

<图1>

<图2>

<图3>

<图4>

<图5>

<图6>
2、创建色相/饱和度调整图层,对黄、绿、青,蓝进行调整,参数设置如图7 - 10,效果如图11。这一步主要把图片中的黄,青色转为绿色。

<图7>

<图8>

<图9>

<图10>

<图11>
3、创建可选颜色调整图层,对红、黄、绿,青进行调整,参数设置如图12 - 15,效果如图16。这一步微调图片中的暖色,并把绿色部分调淡。

<图12>

<图13>

<图14>

<图15>

<图16>
4、创建色相/饱和度调整图层,对绿色进行调整,参数及效果如下图。这一步再把绿色部分调淡。

<图17>

<图18>
5、按Ctrl + J 把当前色相/饱和度调整图层复制一层,不透明度改为:50%,效果如下图。

<图19>
6、创建可选颜色调整图层,对红、黄、绿,白进行调整,参数设置如图20 - 23,效果如图24。这一步主要给图片高光部分增加淡绿色。

<图20>

<图21>

<图22>

<图23>

<图24>
7、创建纯色调整图层,颜色设置为淡绿色:#EDF6E5,确定后把蒙版填充黑色,用白色画笔把右上角部分擦出来,效果如下图。

<图25>
8、按Ctrl + J 把当前纯色调整图层复制一层,混合模式改为“滤色”,不透明度改为:50%,在按Ctrl + Alt + G 创建剪切蒙版,然后把蒙版填充黑色,用白色画笔把右上角局部擦出来,效果如下图。

<图26>
9、创建色彩平衡调整图层,对高光进行调整,参数设置如图27,确定后同上的方法创建剪切蒙版,效果如图28。这几步给图片增加高光。

<图27>

<图28>
10、创建曲线调整图层,对RGB、红,绿通道进行调整,参数设置如图29,确定后把蒙版填充黑色,用白色画笔把左侧边缘部分涂出来,效果如图30。

<图29>

<图30>
11、创建曲线调整图层,把图片暗部调暗一点,参数及效果如下图。

<图31>

<图32>
12、新建一个图层,按字母键“D”把前,背景颜色恢复到默认的黑白,然后选择菜单:滤镜 > 渲染 > 云彩,确定后把混合模式改为“滤色”,不透明度改为:25%,效果如下图。

<图33>
13、创建色彩平衡调整图层,对阴影,高光进行调整,参数设置如图34,35,确定后按Ctrl + Alt + G 创建剪切蒙版,效果如图36。

<图34>

<图35>

<图36>
14、创建可选颜色调整图层,对红色进行调整,参数设置如图37,确定后把图层不透明度改为:50%,效果如图38。这一步微调人物肤色。

<图37>

<图38>
最后简单美化一下人物,微调一下颜色,完成最终效果。

版权声明
本文仅代表作者观点,不代表本站立场。
本文系作者授权发表,未经许可,不得转载。
本文地址:/PMsheji/zhaopianchuli/157590.html


