教程中的文字层次比较强,制作的时候用到了三个图层,底部的用来控制文字的颜色及初步浮雕效果,中间的文字用来增强光感,最上面的用来增加立体感。
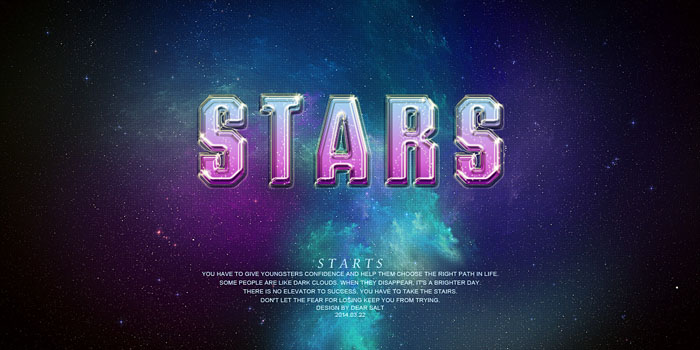
最终效果
1、新建1200 * 600的画布,将素材包中的星光背景置入到画布中去并适当调整大小。然后新建空白图层,填充纹理图案,将此层的图层模式改为“叠加”,不透明度改为:40%。


2、本例教程所选的英文为“Stars”,字体“Deuse”字号200点,位置居中偏上。画布上打上文字,把文字图层复制两层,总共三层,分别命名为“Stars_1”,“Stars_2”,“Stars_3”。

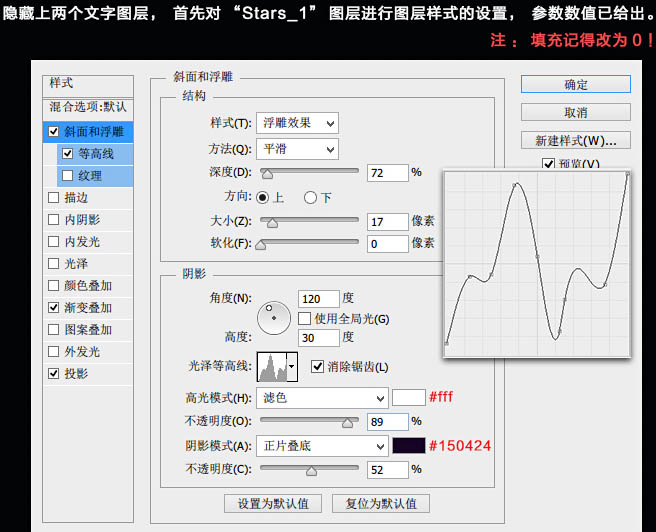
3、隐藏上两个文字图层,首先对“Stars_1”图层进行图层样式的设置,参数如下图。


4、隐藏“Stars_3”图层,接下来对“Stars_2”进行图层样式的设置,确定后把填充改为:0%。


5、接下来是对“Stars_3”进行图层样式的设置,做好以后将此图层向上移动几个像素以便做出立体感的效果,确定后把填充改为:0%。

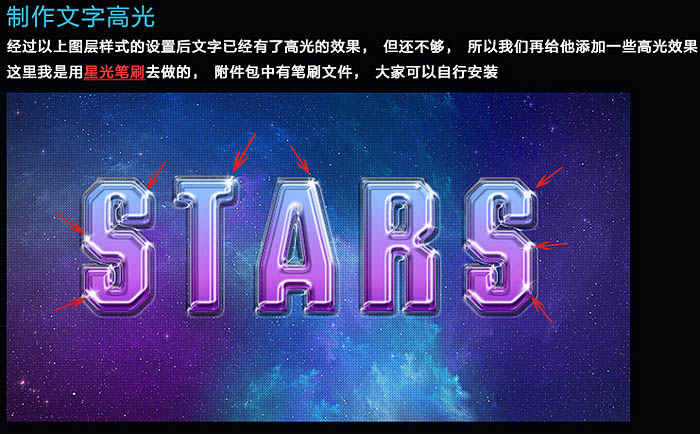
6、经过以上图层样式的设置后文字已经有了高光的效果,但还不够,所有我们再给他添加一些高光效果。
7、为了让整个效果更美观,我又在它的上方建了一个图层,在文字上又加了一些小点点,这些点点都是用画笔设置出来的,具体操作:
选中画笔工具后按F5会弹出画笔设置界面,设置好后新建图层,沿着文字内部涂一下即可。


8、最后调整整体的色彩,在这里我用了曲线,色彩平衡调节,具体参数如下。


最终效果:
最终效果
1、新建1200 * 600的画布,将素材包中的星光背景置入到画布中去并适当调整大小。然后新建空白图层,填充纹理图案,将此层的图层模式改为“叠加”,不透明度改为:40%。
2、本例教程所选的英文为“Stars”,字体“Deuse”字号200点,位置居中偏上。画布上打上文字,把文字图层复制两层,总共三层,分别命名为“Stars_1”,“Stars_2”,“Stars_3”。
3、隐藏上两个文字图层,首先对“Stars_1”图层进行图层样式的设置,参数如下图。
4、隐藏“Stars_3”图层,接下来对“Stars_2”进行图层样式的设置,确定后把填充改为:0%。
5、接下来是对“Stars_3”进行图层样式的设置,做好以后将此图层向上移动几个像素以便做出立体感的效果,确定后把填充改为:0%。
6、经过以上图层样式的设置后文字已经有了高光的效果,但还不够,所有我们再给他添加一些高光效果。
7、为了让整个效果更美观,我又在它的上方建了一个图层,在文字上又加了一些小点点,这些点点都是用画笔设置出来的,具体操作:
选中画笔工具后按F5会弹出画笔设置界面,设置好后新建图层,沿着文字内部涂一下即可。
8、最后调整整体的色彩,在这里我用了曲线,色彩平衡调节,具体参数如下。
最终效果:
版权声明
本文仅代表作者观点,不代表本站立场。
本文系作者授权发表,未经许可,不得转载。
本文地址:/PMsheji/wenzitexiao/156983.html