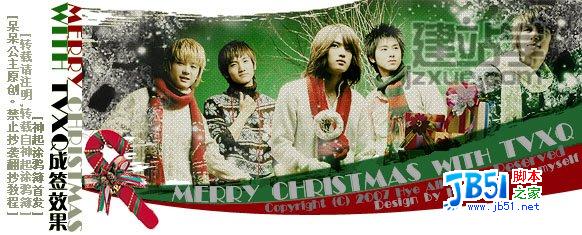
教程重点是文字部分的制作:作者把文字共分为三个部分:主体、积雪、阴影。主体部分直接用图层样式来完成;积雪部分先做出路径,填色后用图层样式做出浮雕效果;阴影部分需要调出文字选区,做一些简单调整,然后填色,并用模糊滤镜适当模糊即可。
最终效果

1、首先我们来搭建背景,新建1920 * 1080的画布,然后导入一张墙壁的背景图素材。


2、接下来对它进行一些简单的调色,使用色彩平衡调整工具。

3、然后我又加深了四边的墙角,在下方加了一个红色渐变,加亮了中间区域的亮度。

4、首先分析字效的组成部分,将整个字效拆分开,共由三部分组成:“积雪层”,“主体层”,“阴影层”。

5、在画布上打上文字,此例字体为“Impact Regular”,然后双击打开图层样式进行修改。


6、在文字的下方有一个底座,具体操作为调出文字选区,然后选择菜单:选择 > 修改 > 扩展,这个操作可以等比例扩大文字选区,数值为8。

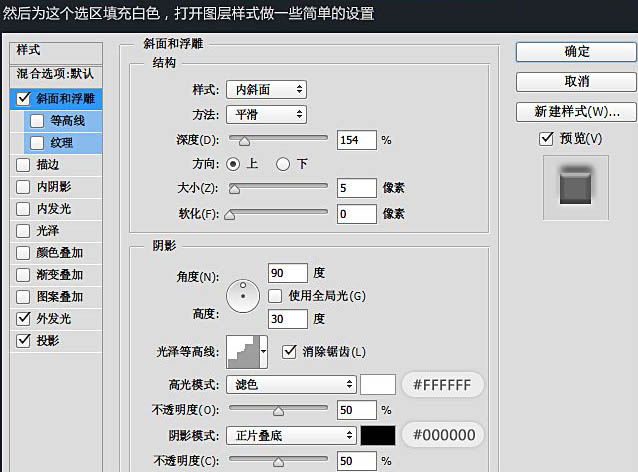
7、然后为这个选区填充白色,打开图层样式做一些简单的设置。


8、调出文字选区,在主体层下方新建一个图层,然后填充黑色,结合自由变换工具盒模糊滤镜即可实现效果。


9、积雪层的制作可以先用钢笔工具把形状勾勒出来,然后再添加图层样式即可。


10、干巴巴的文字太平淡,添加一些圣诞元素,可以使整体作品变得生动起来。

11、彩灯的制作,钢笔路径勾出电线,导入灯泡素材,然后使用色彩平衡工具分别调成不同的颜色。

12、近处的东西注意要做适当的虚化处理,因为这样可以营造出一种空间感。

13、使用柔角画笔工具,颜色数值:#ffefc6,在文字的边缘以及物品周围涂上一层高光,将此层的图层模式改为“滤色”,并适当降低不透明度,当然也可以结合高光素材添加。

14、调整整体颜色:调色的方法不止一种,在这里我使用了曲线和颜色查找。

15、营造雪景:雪景的制作用到了画笔工具,对画笔工具进行一些设置,如拉大间距,散布,设置形状动态中的大小抖动,在画布上刷上一层再使用径向模糊工具做出正下下雪的感觉。


16、最后再锐化一下就可以了。

最终效果:
最终效果
1、首先我们来搭建背景,新建1920 * 1080的画布,然后导入一张墙壁的背景图素材。
2、接下来对它进行一些简单的调色,使用色彩平衡调整工具。
3、然后我又加深了四边的墙角,在下方加了一个红色渐变,加亮了中间区域的亮度。
4、首先分析字效的组成部分,将整个字效拆分开,共由三部分组成:“积雪层”,“主体层”,“阴影层”。
5、在画布上打上文字,此例字体为“Impact Regular”,然后双击打开图层样式进行修改。
6、在文字的下方有一个底座,具体操作为调出文字选区,然后选择菜单:选择 > 修改 > 扩展,这个操作可以等比例扩大文字选区,数值为8。
7、然后为这个选区填充白色,打开图层样式做一些简单的设置。
8、调出文字选区,在主体层下方新建一个图层,然后填充黑色,结合自由变换工具盒模糊滤镜即可实现效果。
9、积雪层的制作可以先用钢笔工具把形状勾勒出来,然后再添加图层样式即可。
10、干巴巴的文字太平淡,添加一些圣诞元素,可以使整体作品变得生动起来。
11、彩灯的制作,钢笔路径勾出电线,导入灯泡素材,然后使用色彩平衡工具分别调成不同的颜色。
12、近处的东西注意要做适当的虚化处理,因为这样可以营造出一种空间感。
13、使用柔角画笔工具,颜色数值:#ffefc6,在文字的边缘以及物品周围涂上一层高光,将此层的图层模式改为“滤色”,并适当降低不透明度,当然也可以结合高光素材添加。
14、调整整体颜色:调色的方法不止一种,在这里我使用了曲线和颜色查找。
15、营造雪景:雪景的制作用到了画笔工具,对画笔工具进行一些设置,如拉大间距,散布,设置形状动态中的大小抖动,在画布上刷上一层再使用径向模糊工具做出正下下雪的感觉。
16、最后再锐化一下就可以了。
最终效果:
版权声明
本文仅代表作者观点,不代表本站立场。
本文系作者授权发表,未经许可,不得转载。
本文地址:/PMsheji/wenzitexiao/156386.html