Photoshop打造梦幻的白色极光
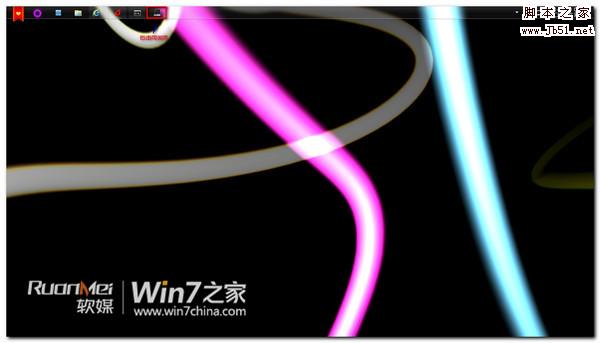
最终效果


1、首先在photoshop中创建一个新图片,大小主要取决于你屏幕的分辨率,我选择了1024*786。使用打开一些晚上的风景照片把它粘贴到图片中命名为“树”,使用自由变换工具调整它的大小。使用魔棒工具选择黑色山坡,然后按下Ctrl+Shift+I反选,按下Delete键删除天空部分,如图所示。


2、打开星素材并粘贴到图片中,然后移到“树”图层的下面,如图所示。

3、创建一个新图层移动到“树”和“星星”图层之间,然后设置前景色为#caee05,使用较大小柔角画笔在山坡与天空交界的位置涂抹出一条光带,然后执行“滤镜—模糊—高斯模糊”设置半径为20px,图层的混合模式为强光,不透明度为50%,如图所示。


4、参考上步骤的方法再制作一层光带,颜色为#b3e8d。设置高斯模糊效果,半径为20px,设置动感模糊效果,角度为90度,距离为50。然后设置混合模式为“变亮”,不透明度为90%,如图所示。


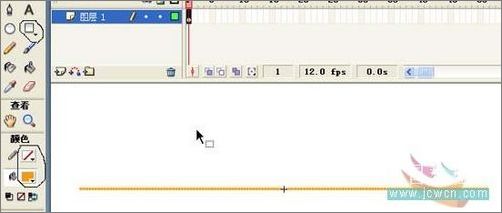
5、在photoshop中创建一个背景透明的新图片,大小为30*300。使用钢笔工具在图片上制作一条直线的路径,然后设置前景色为黑色,选择一个大小为9px的画笔工具,单击右键选择“描边路径”,在弹出的对话框中勾选“模拟压力”。接着执行“编辑—定义画笔预设”,给这个新画笔输入一个名称,按下F5打开画笔面板,设置刚才定义的新画笔,如图所示。


6、创建一个新图层,设置前景色为#8cb37c,使用设置好的新画笔绘制一些光线效果,然后执行“滤镜—模糊—动感模糊”设置角度为63,距离为100,图层的混合模式为颜色减淡,如图所示。

7、前面我们制作的都是绿色的光,下面制作一个紫色光。使用颜色#953f5e,设置高斯模糊半径为100,混合模式为“排除”,如图所示。

8、创建一个新图层,设置前景色为#92566b,在上一步骤相同的位置绘制光线,然后执行动感模糊效果,角度为90,距离为100px,设置混合模式为叠加,如图所示。

9、接下来我们作最后产润色。打开画笔面板重新设置画笔预设,参考下图。创建一个新图层,使用设置好画笔在图片中添加一些闪光的效果,然后执行高斯模糊,设置半径为5px,图层不透明度为50%,如图所示。


10、最合创建一个新图层,按下D设置默认的黑白前景色和背景色,执行“滤镜—渲染—云彩”,设置图层混合模式为柔光,不透明度为25%,如图所示。

最终效果:
1、首先在photoshop中创建一个新图片,大小主要取决于你屏幕的分辨率,我选择了1024*786。使用打开一些晚上的风景照片把它粘贴到图片中命名为“树”,使用自由变换工具调整它的大小。使用魔棒工具选择黑色山坡,然后按下Ctrl+Shift+I反选,按下Delete键删除天空部分,如图所示。
2、打开星素材并粘贴到图片中,然后移到“树”图层的下面,如图所示。
3、创建一个新图层移动到“树”和“星星”图层之间,然后设置前景色为#caee05,使用较大小柔角画笔在山坡与天空交界的位置涂抹出一条光带,然后执行“滤镜—模糊—高斯模糊”设置半径为20px,图层的混合模式为强光,不透明度为50%,如图所示。
4、参考上步骤的方法再制作一层光带,颜色为#b3e8d。设置高斯模糊效果,半径为20px,设置动感模糊效果,角度为90度,距离为50。然后设置混合模式为“变亮”,不透明度为90%,如图所示。
5、在photoshop中创建一个背景透明的新图片,大小为30*300。使用钢笔工具在图片上制作一条直线的路径,然后设置前景色为黑色,选择一个大小为9px的画笔工具,单击右键选择“描边路径”,在弹出的对话框中勾选“模拟压力”。接着执行“编辑—定义画笔预设”,给这个新画笔输入一个名称,按下F5打开画笔面板,设置刚才定义的新画笔,如图所示。
6、创建一个新图层,设置前景色为#8cb37c,使用设置好的新画笔绘制一些光线效果,然后执行“滤镜—模糊—动感模糊”设置角度为63,距离为100,图层的混合模式为颜色减淡,如图所示。
7、前面我们制作的都是绿色的光,下面制作一个紫色光。使用颜色#953f5e,设置高斯模糊半径为100,混合模式为“排除”,如图所示。
8、创建一个新图层,设置前景色为#92566b,在上一步骤相同的位置绘制光线,然后执行动感模糊效果,角度为90,距离为100px,设置混合模式为叠加,如图所示。
9、接下来我们作最后产润色。打开画笔面板重新设置画笔预设,参考下图。创建一个新图层,使用设置好画笔在图片中添加一些闪光的效果,然后执行高斯模糊,设置半径为5px,图层不透明度为50%,如图所示。
10、最合创建一个新图层,按下D设置默认的黑白前景色和背景色,执行“滤镜—渲染—云彩”,设置图层混合模式为柔光,不透明度为25%,如图所示。
最终效果:
版权声明
本文仅代表作者观点,不代表本站立场。
本文系作者授权发表,未经许可,不得转载。
本文地址:/PMsheji/PS/146986.html