Photoshop制作带水珠的雾化玻璃效果
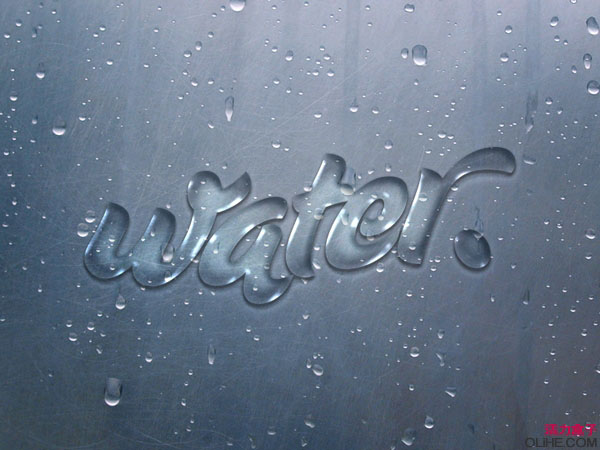
原图

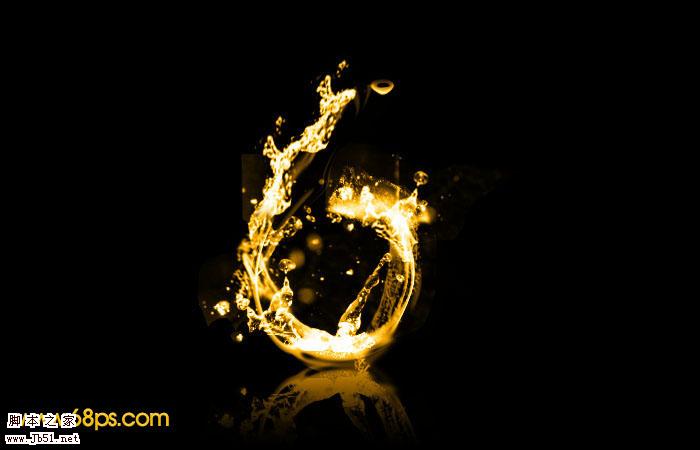
最终效果

1、新建2560*1440px的文档(素材已经被压缩,实际新建的画面要小一点),给背景填充深灰色。 2、F5打开笔刷面板,调整如下图所示。


3、新建组,在组下新建图层,用刚才调整好的白色笔刷在图层1上涂抹(可以不断改变画笔的大小,效果更好)。

4、选择背景图层和组,合并。ctrl+L打开色阶面板,将黑色改为124,白色161;这是为了消除模糊地边缘。

5、选择魔棒工具选取深色背景区域,右键选择选取相似,确保所有深色背景都被选上,然后删除。 6、导入素材图片,复制,高斯模糊20。选择图层样式,添加颜色叠加,深灰色,60%的不透明度。(自己在网上找一些图片或用照片效果也不错)。
7、将背景放到最上方,并改变其图层样式。


8、再次复制素材图层,高斯模糊5。将它放在第一次复制的素材图层的上面。

9、选择图层1的选区,选择第二次复制的素材图层,然后添加蒙版(快速蒙版或图层>图层蒙版>显示选区)。为刚才的蒙版添加动感模糊,角度-90,距离80px。打开色阶(还是在蒙版上),调整数值如下图效果,以消除模糊边缘。

10、复制添加了5像素高斯模糊的图层,删除蒙版,用文字工具打上几个手写字,重复步骤9。

11、在水滴图层的下面新建图层,再次用笔刷添加更多的小水滴,尤其是在文字下方,然后将前面添加的水滴图层样式拷贝到这个图层上。

12、复制步骤10的图层,删除蒙版,选择图层>图层蒙版>隐藏全部。为蒙版添加云彩效果(前背景色为黑白)。这会使效果更真实。

13、选择所有图层,ctrl+shift+alt+E盖印。给盖印的图层添加高斯模糊20。改变其混合模式为叠加,不透明度为40%。复制盖印图层,改变其混合模式为滤色,保持其40%的不透明度。

14、在最上方新建图层,任意填充颜色,将填充改为0%。添加渐变填充的图层样式。

最终效果:
最终效果
1、新建2560*1440px的文档(素材已经被压缩,实际新建的画面要小一点),给背景填充深灰色。 2、F5打开笔刷面板,调整如下图所示。
3、新建组,在组下新建图层,用刚才调整好的白色笔刷在图层1上涂抹(可以不断改变画笔的大小,效果更好)。
4、选择背景图层和组,合并。ctrl+L打开色阶面板,将黑色改为124,白色161;这是为了消除模糊地边缘。
5、选择魔棒工具选取深色背景区域,右键选择选取相似,确保所有深色背景都被选上,然后删除。 6、导入素材图片,复制,高斯模糊20。选择图层样式,添加颜色叠加,深灰色,60%的不透明度。(自己在网上找一些图片或用照片效果也不错)。
7、将背景放到最上方,并改变其图层样式。
8、再次复制素材图层,高斯模糊5。将它放在第一次复制的素材图层的上面。
9、选择图层1的选区,选择第二次复制的素材图层,然后添加蒙版(快速蒙版或图层>图层蒙版>显示选区)。为刚才的蒙版添加动感模糊,角度-90,距离80px。打开色阶(还是在蒙版上),调整数值如下图效果,以消除模糊边缘。
10、复制添加了5像素高斯模糊的图层,删除蒙版,用文字工具打上几个手写字,重复步骤9。
11、在水滴图层的下面新建图层,再次用笔刷添加更多的小水滴,尤其是在文字下方,然后将前面添加的水滴图层样式拷贝到这个图层上。
12、复制步骤10的图层,删除蒙版,选择图层>图层蒙版>隐藏全部。为蒙版添加云彩效果(前背景色为黑白)。这会使效果更真实。
13、选择所有图层,ctrl+shift+alt+E盖印。给盖印的图层添加高斯模糊20。改变其混合模式为叠加,不透明度为40%。复制盖印图层,改变其混合模式为滤色,保持其40%的不透明度。
14、在最上方新建图层,任意填充颜色,将填充改为0%。添加渐变填充的图层样式。
最终效果:
版权声明
本文仅代表作者观点,不代表本站立场。
本文系作者授权发表,未经许可,不得转载。
本文地址:/PMsheji/PS/146933.html