Photoshop打造非常精致的木盒图标
最终效果

1、图层分解,大致可按顺序分为以下几个部分。

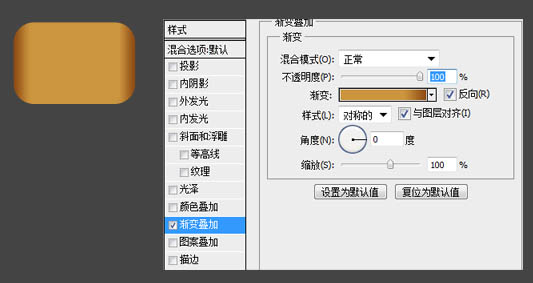
2、新建大小适当的画布,背景填充暗灰色,新建一个图层用钢笔勾出顶部框框的轮廓,转为选区后填充任意颜色,然后双击图层添加渐变叠加样式,参数设置如下图。

3、新建一个图层,用钢笔勾出前部遮挡板的轮廓路径,转为选区后填充任意色,然后再设置渐变叠加样式,参数及效果如下图。

4、新建一个图层,同上的方法制作前部框框,图层样式及效果如下图。

5、新建一个图层,同上的方法制作底面部分,图层样式参数及效果如下图。

6、新建一个图层,同上方法制作前部可见立面,效果如下图。
7、木质纹理添加:
去网上下载一些木质纹理的笔刷。这里可以用笔刷点完纹理之后,再加载选区进行蒙版,笔刷的纹理需要被锐化,这样纹理会显得比较清晰。

8、高光及阴影制作:
下面就是给它刷点亮漆,让它有点亮光,制作过程如下图。


最终效果:

1、图层分解,大致可按顺序分为以下几个部分。
2、新建大小适当的画布,背景填充暗灰色,新建一个图层用钢笔勾出顶部框框的轮廓,转为选区后填充任意颜色,然后双击图层添加渐变叠加样式,参数设置如下图。
3、新建一个图层,用钢笔勾出前部遮挡板的轮廓路径,转为选区后填充任意色,然后再设置渐变叠加样式,参数及效果如下图。
4、新建一个图层,同上的方法制作前部框框,图层样式及效果如下图。
5、新建一个图层,同上的方法制作底面部分,图层样式参数及效果如下图。
6、新建一个图层,同上方法制作前部可见立面,效果如下图。
7、木质纹理添加:
去网上下载一些木质纹理的笔刷。这里可以用笔刷点完纹理之后,再加载选区进行蒙版,笔刷的纹理需要被锐化,这样纹理会显得比较清晰。
8、高光及阴影制作:
下面就是给它刷点亮漆,让它有点亮光,制作过程如下图。
最终效果:
版权声明
本文仅代表作者观点,不代表本站立场。
本文系作者授权发表,未经许可,不得转载。
本文地址:/PMsheji/PS/146836.html