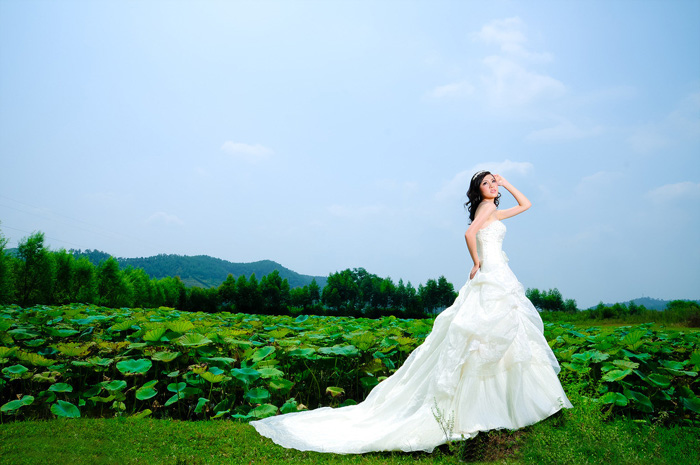
Photoshop将海景婚片调成甜美的青绿色图片调色效果
原图

最终效果

1、打开原图素材,创建色相/饱和度调整图层,选择青色,用吸管吸取天空颜色调整,参数设置如图1,效果如图2。

<图1>

<图2>
2、创建可选颜色调整图层,对红,黄进行调整,参数设置如图3,4效果如图5。

<图3>

<图4>

<图5>
3、创建色彩平衡调整图层,对中间调及高光进行调整,参数设置如图6,7效果如图8。

<图6>

<图7>

<图8>
4、按Ctrl + Alt + ~ 调出高光选区,按Ctrl + Shift + I 反选,新建一个图层填充颜色:#4D065F,图层混合模式改为“颜色减淡”,不透明度改为:10%,效果如下图。

<图9>
5、创建可选颜色调整图层,对红,绿进行调整,参数设置如图10,11,效果如图12。

<图10>

<图11>

<图12>
6、创建曲线调整图层,对红,绿,蓝微调一下,参数设置如图13 - 15,效果如图16。

<图13>

<图14>

<图15>

<图16>
7、按Ctrl + Alt + ~ 调出高光选区,按Ctrl + Shift + I 反选,新建一个图层填充颜色:#4D065F,图层混合模式改为“滤色”,不透明度改为:34%,效果如下图。

<图17>
8、新建一个图层,图层混合模式改为“滤色”,把前景颜色设置为:#4D065F,用画笔把下图选区部分涂上高光,再适当降低图层不透明度,效果如下图。

<图18>
9、新建一个图层,简单给图片加上暗角,如下图。

<图19>
10、把背景图层复制一层,按Ctrl + Shift + ] 置顶,按Ctrl + Shift + U 去色,图层混合模式改为“正片叠底”,不透明度改为:40%,按住Alt 键添加图层蒙版,用白色画笔把人物衣服部分擦出来,增加衣服细节。

<图20>
11、创建可选颜色调整图层,对红色进行调整,参数设置如图21,效果如图22。

<图21>

<图22>
最后调整一下整体颜色,完成最终效果。


最终效果

1、打开原图素材,创建色相/饱和度调整图层,选择青色,用吸管吸取天空颜色调整,参数设置如图1,效果如图2。

<图1>

<图2>
2、创建可选颜色调整图层,对红,黄进行调整,参数设置如图3,4效果如图5。

<图3>

<图4>

<图5>
3、创建色彩平衡调整图层,对中间调及高光进行调整,参数设置如图6,7效果如图8。

<图6>

<图7>

<图8>
4、按Ctrl + Alt + ~ 调出高光选区,按Ctrl + Shift + I 反选,新建一个图层填充颜色:#4D065F,图层混合模式改为“颜色减淡”,不透明度改为:10%,效果如下图。

<图9>
5、创建可选颜色调整图层,对红,绿进行调整,参数设置如图10,11,效果如图12。

<图10>

<图11>

<图12>
6、创建曲线调整图层,对红,绿,蓝微调一下,参数设置如图13 - 15,效果如图16。

<图13>

<图14>

<图15>

<图16>
7、按Ctrl + Alt + ~ 调出高光选区,按Ctrl + Shift + I 反选,新建一个图层填充颜色:#4D065F,图层混合模式改为“滤色”,不透明度改为:34%,效果如下图。

<图17>
8、新建一个图层,图层混合模式改为“滤色”,把前景颜色设置为:#4D065F,用画笔把下图选区部分涂上高光,再适当降低图层不透明度,效果如下图。

<图18>
9、新建一个图层,简单给图片加上暗角,如下图。

<图19>
10、把背景图层复制一层,按Ctrl + Shift + ] 置顶,按Ctrl + Shift + U 去色,图层混合模式改为“正片叠底”,不透明度改为:40%,按住Alt 键添加图层蒙版,用白色画笔把人物衣服部分擦出来,增加衣服细节。

<图20>
11、创建可选颜色调整图层,对红色进行调整,参数设置如图21,效果如图22。

<图21>

<图22>
最后调整一下整体颜色,完成最终效果。

版权声明
本文仅代表作者观点,不代表本站立场。
本文系作者授权发表,未经许可,不得转载。
本文地址:/PMsheji/PS/143201.html


